Google Tag Manager (GTM) Template
If you use Google Tag Manager on your website, you can utilize Rockerbox’s Tag Template to easily set up your pixels without having to write any JavaScript. Follow along below to get started!
Before you Start
Please ensure you are logged into the appropriate GTM container for your website. Rockerbox’s Template will fire your pixels as part of the GTM Tag, but you will need to provide the appropriate Triggers and Variables to ensure everything works correctly. If you need additional help, please contact your Rockerbox representative for assistance.
Install the Template
Go to the Google Tag Manager Template Gallery and search for Rockerbox. Click Add to Workspace in the top right corner to install the template in your GTM container.
Page View
The first tag you will need to place on your website is for page views. This will fire every time a new page is loaded and will be used by Rockerbox to help track your site traffic and user activity.
In your Google Tag Manager container, go to Tags and click New.
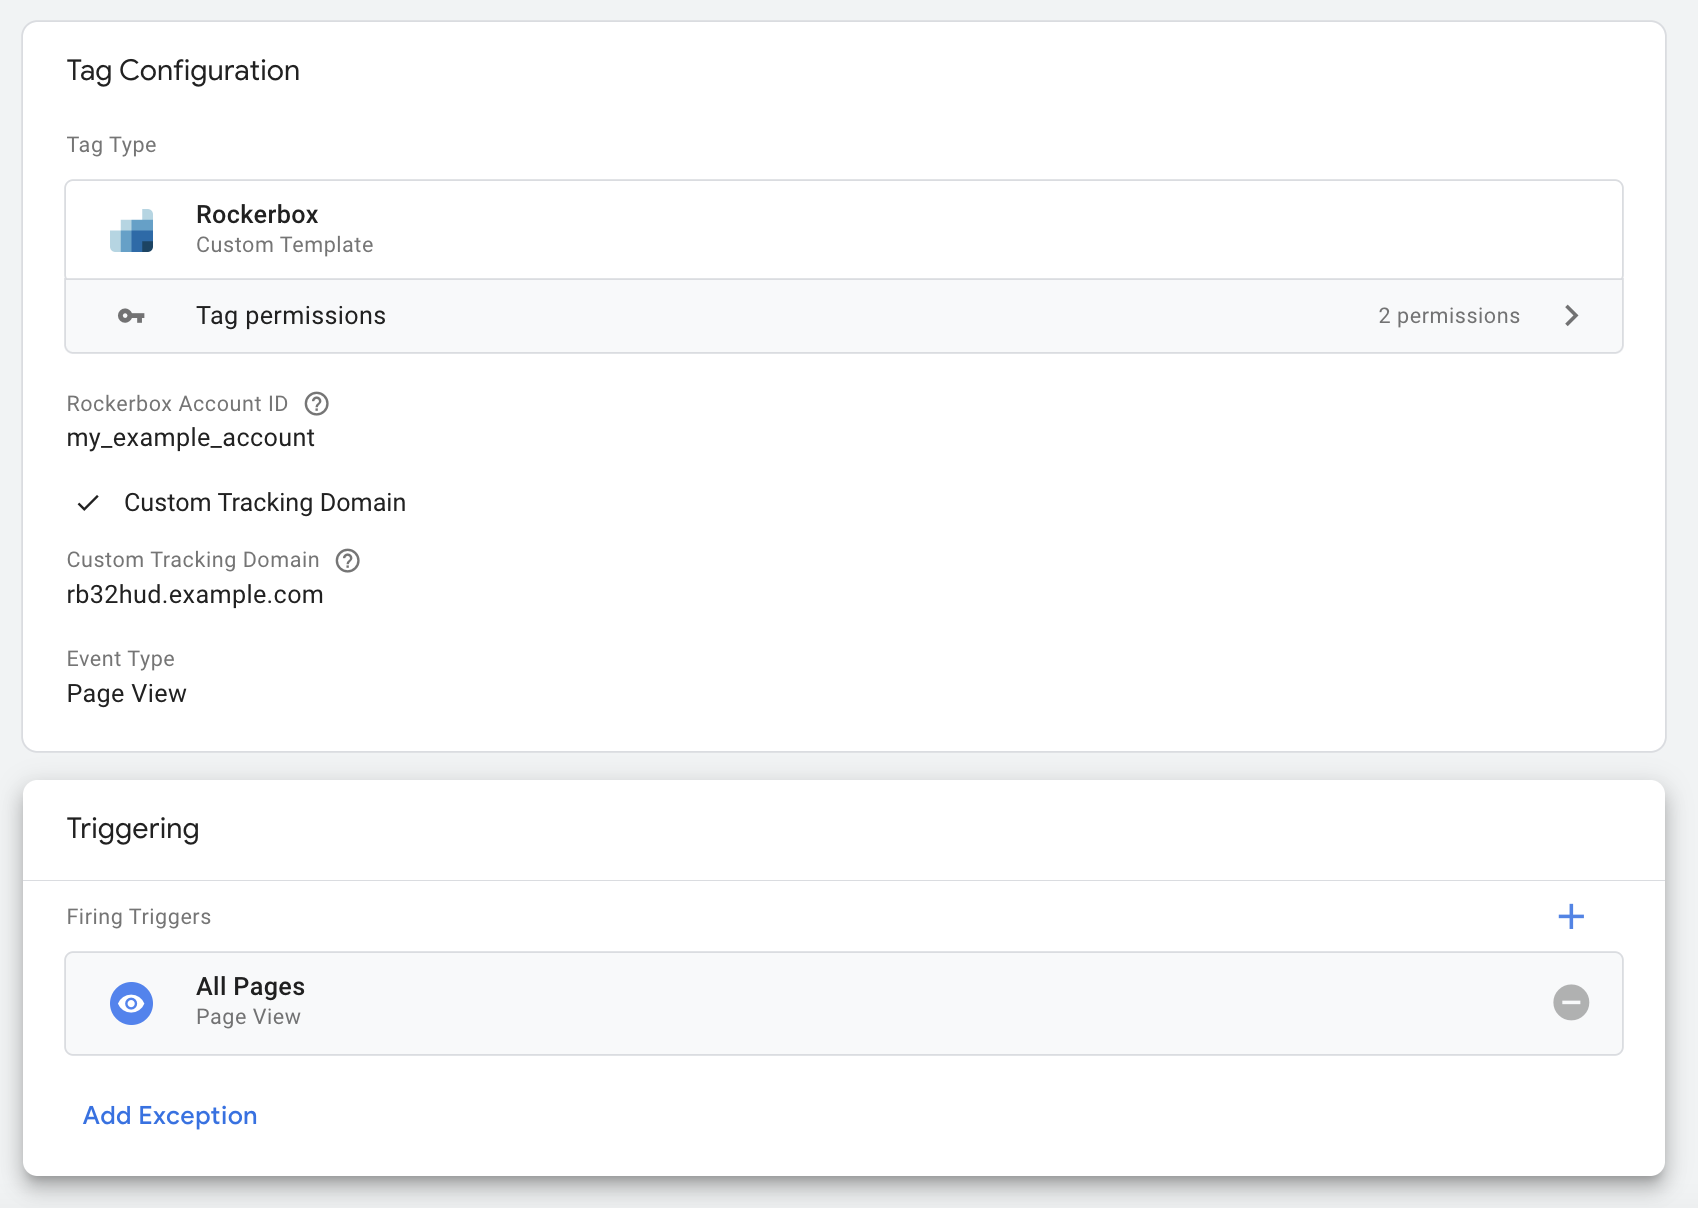
Under Tag Configuration, select the Rockerbox tag type.
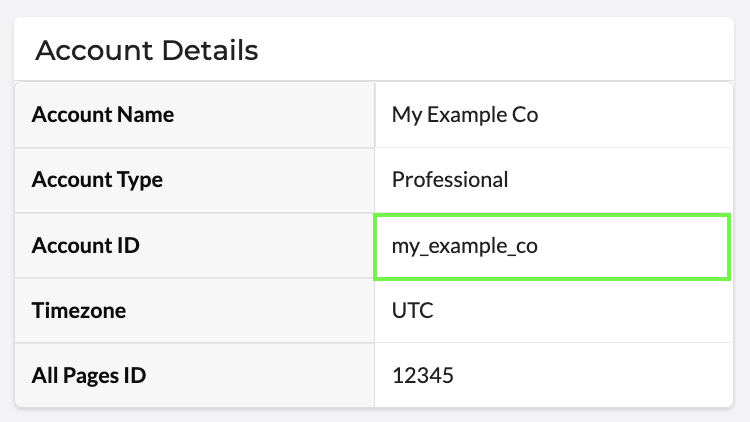
First, you’ll need to enter your Rockerbox Account ID. You can find this by going to Settings > My Account in your Rockerbox account.
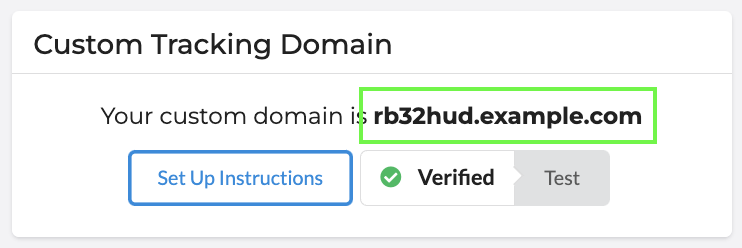
If you have a custom tracking domain, check the box and enter your domain. You can find this under Settings > Domains in your Rockerbox account.
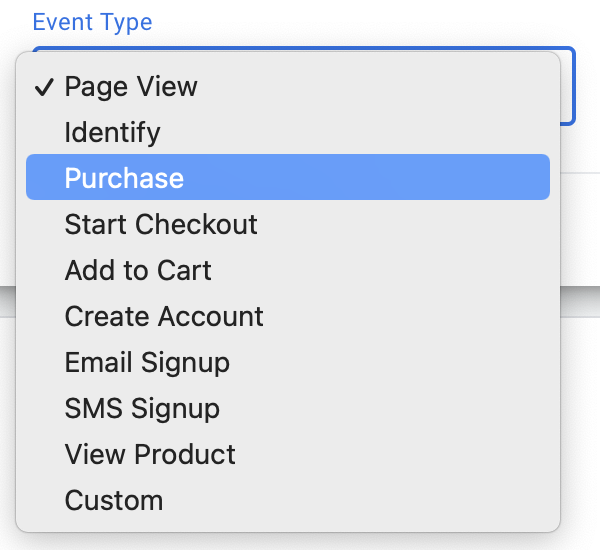
To finish your Tag Configuration, select “Page View” for your event type.
Lastly, you will need to select a Trigger for when this Tag should fire. For most websites, you can use the “All Pages - Page View” trigger that comes default in GTM. If you have a Single Page App (SPA), you should also add the “History Change” trigger.
Give your tag a name (“Rockerbox Page View”) and hit Save!
Identify
In order to help Rockerbox associate browser sessions with a particular user, you will need to fire an Identify event whenever a user’s identity is known to you (e.g. once a user logs in, views an order confirmation page, or clicks a link from an email).
Follow the process again to create a new Tag using the Rockerbox tag type. Enter the same settings for your Rockerbox Account ID and Custom Tracking Domain as before.
This time, select “Identify” under the event type.
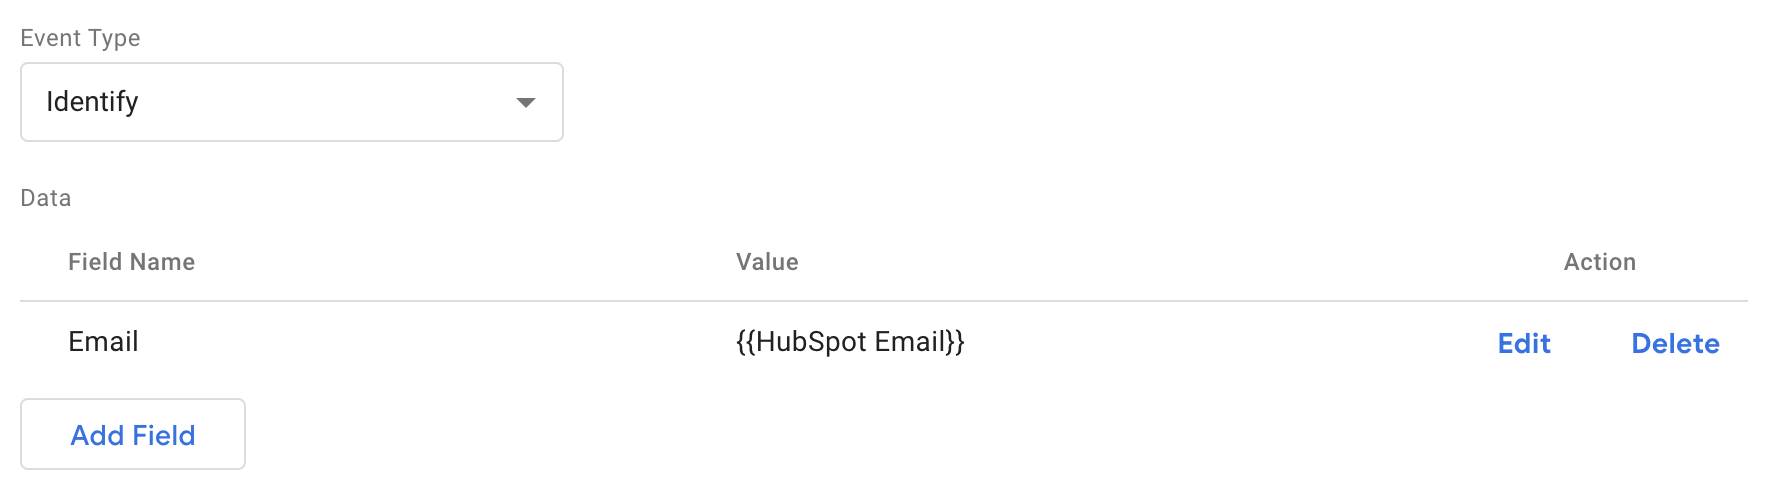
Under the Data section, click Add Field and select the type of attribute you’d like to send to Rockerbox (email, phone number, customer ID, etc). You’ll also need to select a corresponding GTM variable that contains that information.
Rockerbox supports the following fields as part of an identify call:
Field | Details |
external_id | This is your internal customer ID or user ID. This value must be persistent. |
Rockerbox supports receiving the user's unhashed or hashed email. If you are passing us the user's unhashed email, please ensure the email is lower-cased. If you are passing us the user's hashed email, please ensure it is hashed as outlined in our documentation. | |
phone_number | The 10-digit phone number of the user. |
Make sure that your GTM variable isn’t set up to have a default value, e.g. “no email set.” If a value isn’t available, it should be empty. Setting defaults will cause issues with your identity graph in Rockerbox.
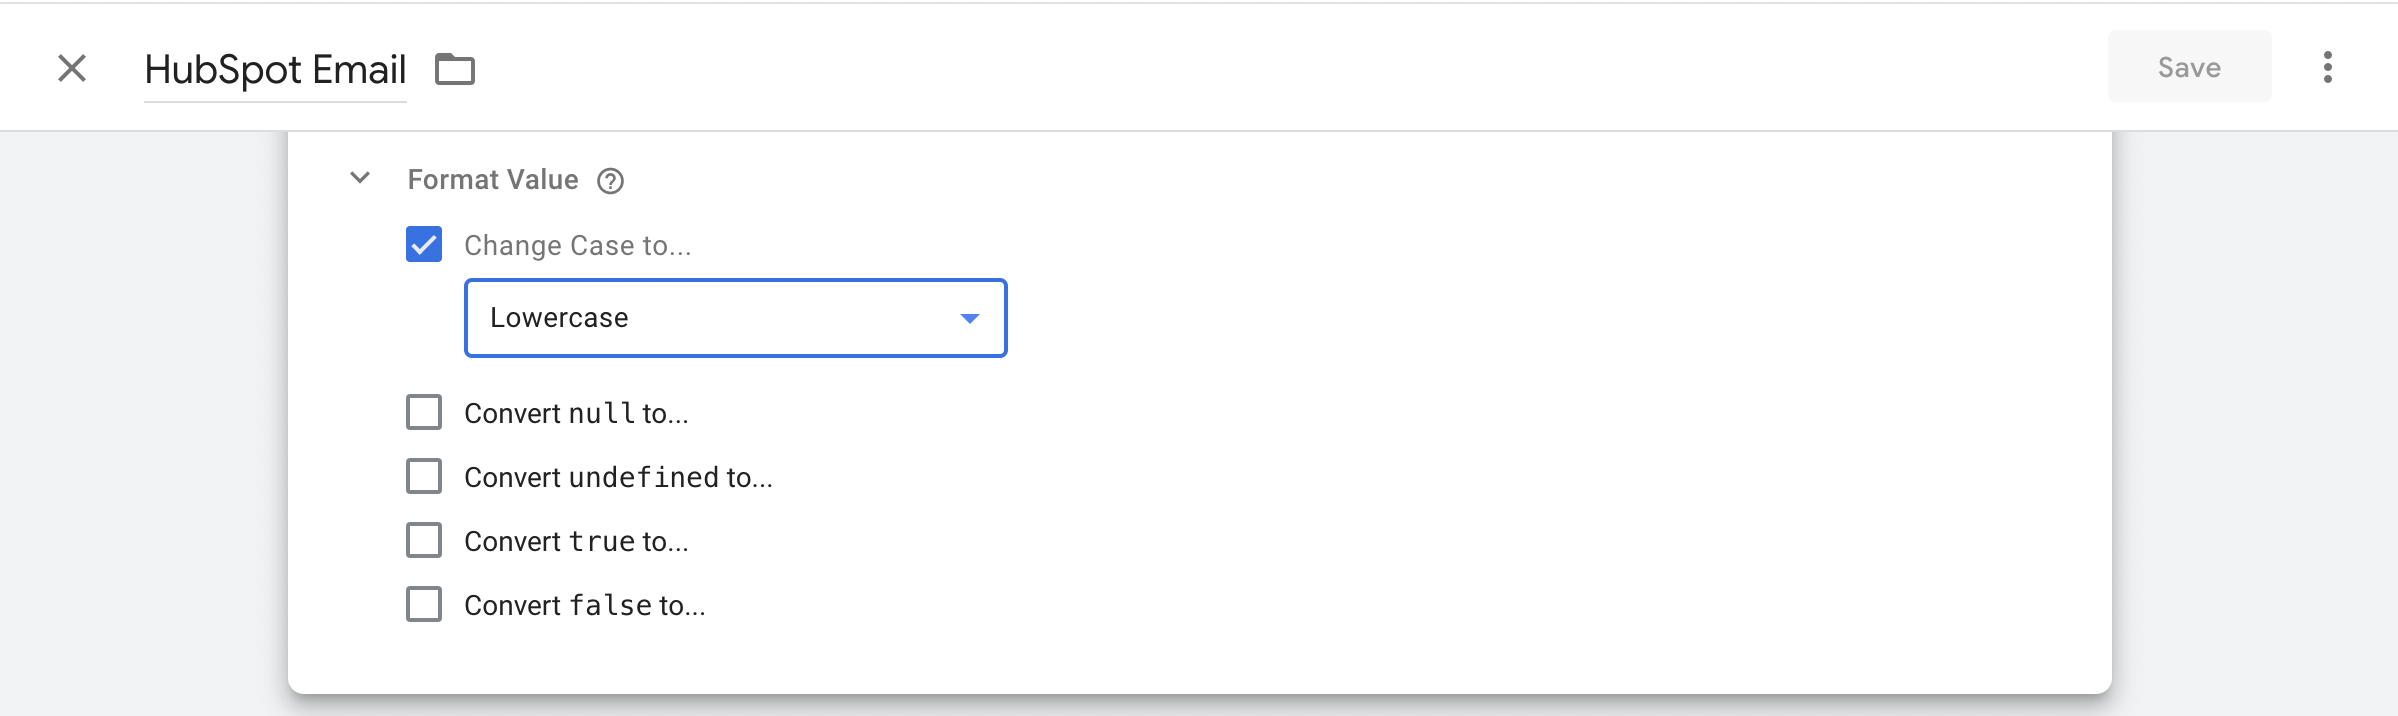
Make sure the Email variable you are using in GTM is being lower-cased. You can do this by clicking into the Email variable in GTM, clicking on the Format Value dropdown, checking off the "Change Case To" option and selecting Lowercase in the dropdown.
Lastly, you’ll need to select a Trigger for your new tag. You may want to select multiple triggers, depending on when identifiable user information becomes available. If needed, you can fire the Identify event multiple times on the page. When you’re done, give your tag and name and hit Save!
Conversions
Conversion events allow you to track key actions that users are taking on your website. This could be a purchase, add to cart, submitting a form, creating an account, etc.
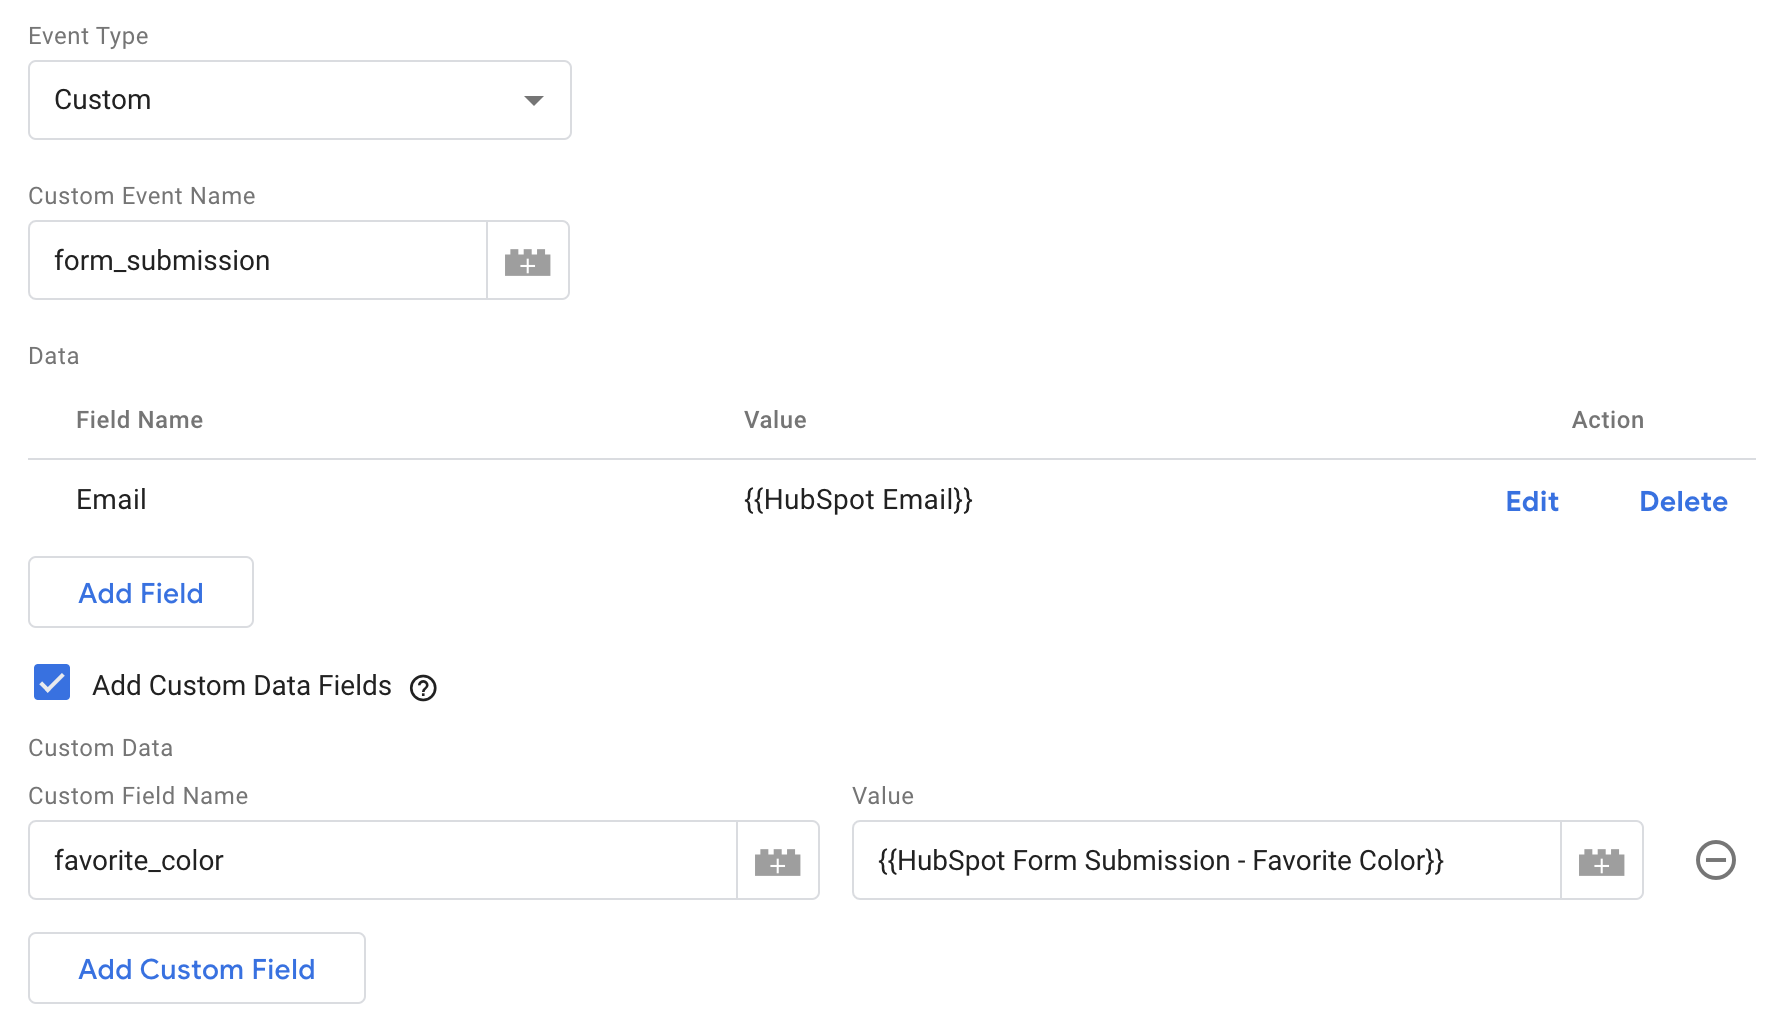
You can choose one of the predefined conversion event types (Purchase, Start Checkout, View Product, etc.) or select “Custom” and enter your own conversion event name.
Use the Data table to add any fields and properties associated with your event. If you’re tracking a Purchase or Order, be sure to include Order ID, Revenue, and an Email or Customer ID.
If you would like to add any custom fields, check the “Add Custom Data Fields” box and add any fields using the table below.
Just as with your Identify pixel, you can pass parameters to Rockerbox for the events tracked by your conversion pixels. If you have a purchase event, you can pass values like revenue and products to Rockerbox. Below are some of the standard keys used in conversion pixels.
Field | Required? | Details |
external_id | Yes, for purchase pixels and any other conversion pixels where the external_id is available | This is your internal customer ID or user ID. This value must be persistent. |
Yes, for purchase pixels and any other conversion pixels where the external_id is available | Rockerbox supports receiving the user's unhashed or hashed email. If you are passing us the user's unhashed email, please ensure the email is lower-cased. If you are passing us the user's hashed email, please ensure it is hashed as outlined in our documentation. | |
order_id | Yes, for purchase pixels | This should match the order IDs used in your first party reporting. |
revenue | Yes, for purchase pixels | Revenue included in the pixel should match the revenue you consider for the conversion. Keep this in mind when choosing between variables that contain taxes, discount codes, etc. The formatting for this value should be in dollars, including decimal points. |
coupon | Required when you are using coupon codes as part of your attribution solution. Talk to your Rockerbox representative if you are unsure if this applies to you. | The value should be formatted as a string and contain only the promo code. |
products | Not required but recommended in case you want to do product-level analyses | The value for products should be formatted as a string. Generally, you can use ecommerce.purchase.products as the variable. When adding that variable to your JSON object, you can convert it to a string using JSON.stringify(). |
address_street_1 | Required if you are running direct mail | This is your street address without the apartment or unit number (for ex: 100, First Street) |
address_city | Required if you are running direct mail | For ex: Los Angeles |
address_state | Required if you are running direct mail | For ex: CA |
address_zip_code | Required if you are running direct mail | 5-digit zip code (for ex: 94133) |
order_type | Required if you have different types of purchases (for ex: one-time purchases and subscription starts) | This should be populated with the different types of purchases that occur on your site (for ex: one-time purchase vs subscription start) |
currency_code | Required if revenue for all purchases is not in USD | For ex: USD or GBP |
customer_type | Required if you are not passing Rockerbox a historical user file but want to see new vs repeat customers broken out in Rockerbox data | For ex: new vs repeat |
Once you have added all relevant variables to your Rockerbox conversion pixel, please add a trigger to the pixel. For your purchase event, choose a trigger that ensures Rockerbox's purchase pixel will fire as soon as the user has completed their purchase on your site and ensure all required fields are in the data layer so that they can be included in Rockerbox's purchase pixel.
Repeat this process for as many conversions as you would like to track in Rockerbox. When you’re all done, save your tags and triggers, and publish your updates in GTM!
Testing your Pixels
After pixel implementation is complete, please notify the Implementation team at Rockerbox so that they can run through pixel QA and share their findings with you.
Once pixel QA is complete and the Implementation team at Rockerbox has confirmed that all pixels are firing as expected, you are all set!